
She've been seeking for my help throughout these few months just to ask me to give her advice on how to celebrate her birthday.
From venues to decorations to birthday t-shirts yada yada :)
Rowena, I didn't even remember how I celebrated my 18th birthday seriously, except for the part where I drank some cocktails in front of my parents.
Well, I knew that you wanted a hand drewn DIY t-shirt so badly. So it didn't take me time to think twice on what to give you honestly :P
I really hope that you'll like my design lar, cuz I knew that you wanted other wordings on it at first :)
Now, for my DIY T-shirt painting tutorial (stencil):
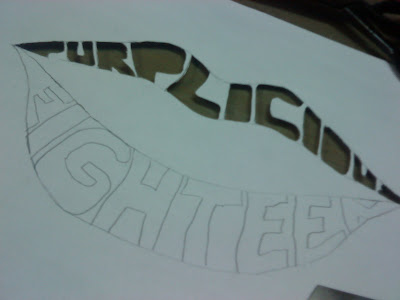
 1) Firstly, design a picture for the tee on a piece of paper: it may be hand drawn, computerized designs, or drawings of a 3 year old toddler. Then cut out the parts that you want to colour.
* additional advice, after doing it on the paper, place a transparent plastic cover on top, use a marker to outline it again, then only cut out the parts. This is because paper is extremely fragile. Once you tore a part of the paper, it'll be a hard job for you to do the stencil colouring.*


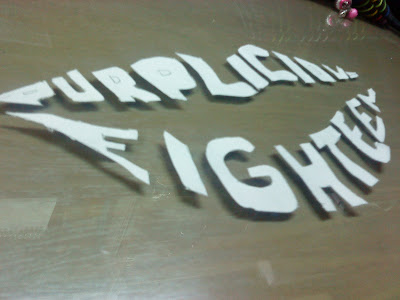
 This one's for fun seriously. Or you may use these as stencils instead :)
 It's your choice of creativity right?
 2) Place the stencil on top of the plain shirt you bought, make sure the shirt is pulled tightly so that your paint won't wobble around or colour any other unexpected areas.
 * additional tip, please hand wash the clothing before use as new clothings have a layer of wax that'll effect the colouring of the tee. *
 3) Be sure to place a cardboard in between so that you won't colour till the 2nd layer of the shirt.
 4) Buy the desired colour, less description. You can choose to use either a sponge or a paint brush.
 Sorry I'm using my phone for these pictures. Macro won't work. The brand's pebeo.
 5) Prepare a flat surface for the paint, probably tiles, paper plates etc.
Place your desired tools, ie sponge into the colour, and start DABBING on the stencil.
Yes DAB, don't COLOUR.
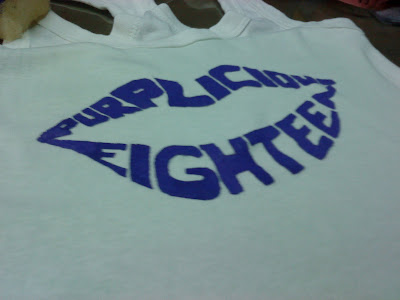
 6) Remove the stencil and let it dry for about 10-20 mins.
 7) If you want your beloved to remember you FOREVER, be sure to get yourself a signature at a particular part of the shirt. Mine's as below :)

 8) Next, once the paint is dried, iron on the surface to prevent the paint from coming off after laundry.
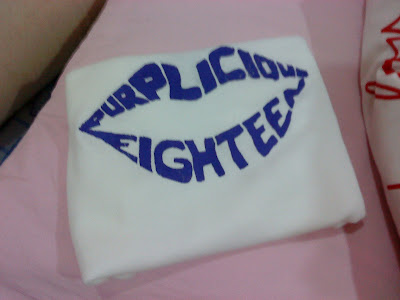 After iron.
 Damn buay paiseh posing with the shirt. Seriously beh tahan. And I showed everyone my untidied bed. WTF.
 Ahh~~~ I love this :) But I'm no longer eighteen.
 9) Next, if this is a gift to your friend, wrap it nicely, don't use wrappers, it's really outdated.
Use your creativity, as above :D
Well, I hope this "tutorial" benefits you people.
Rowena, I bought the materials on the night before your b'day seriously. You gotta be impressed that the shirt can dry within a night and the paint can dry so fast :)
And after her birthday party, I got to know that I actually own some sex toys.
 Vibrators. in doubles some more. =.= WTF.
 Seemed familiar to some people???? :D
 It's a free gift from OGAWA :D
Cheers to dirty minded people :)
2 comments:
WTF so much work okay!! Where did you get your patience? I wish I could have half of yours! OMG! You made it sound so easy but cutting it and placing it and dabbing it and ironing it and camwhoring with it (lol)...I'm so touched :') *sniff*
I really hate handmade gifts lor. They make me wana cry seeing how much effort is put into it! Owh Maggie thankiu so much for your patience in this!
you said this doesn't really stand out amongst the gifts, but it's one of the most unique ones! I really really love it! :D
Thanks again! *mwah mwah mwah!!*
p/s: LOL! We're vibrator owners! :D I can share you my "texture caps"!
RwN, where got so much work? Ok only lar~ :D
You are welcomed!!!
Actually U've got great frens who gave you lots of hand made gifts also what :)
Haha, share "texture caps"? SURE :D
Post a Comment